import Tabs from '@theme/Tabs'; import TabItem from '@theme/TabItem';
From Sipmon 24.10, MAP Legacy will no longer be available. We recommend you install the new MAP module instead.
MAP has significant advantages compared to MAP (Legacy), including:
- Web editor: Create and edit your views directly from your web browser.
- New server: Brand new server and data model providing better performance.
Sipmon MAP (Legacy) requires a valid license key. To purchase one and retrieve the necessary repositories, contact Sipmon.
This chapter describes how to install Sipmon MAP (Legacy). The server must be installed on a dedicated machine to allow Sipmon MAP (Legacy) to operate with its own database and avoid any potential conflict with the Sipmon central server.
Before installation, be sure to review the Prerequisites chapter for system requirements (CPU and memory). Remember to choose the best type of architecture to suit your needs.
Architecture
Sipmon MAP (Legacy) consists of three components:
- Sipmon MAP (Legacy) Server, developed in Java, using SpringBoot, Hibernate and CXF
- Sipmon MAP (Legacy) Web interface, developed in Javascript, based on Backbone.js
- Sipmon MAP (Legacy) Desktop Client, developed in Java, based on Eclipse RCP 4.
The diagram below summarizes the architecture:
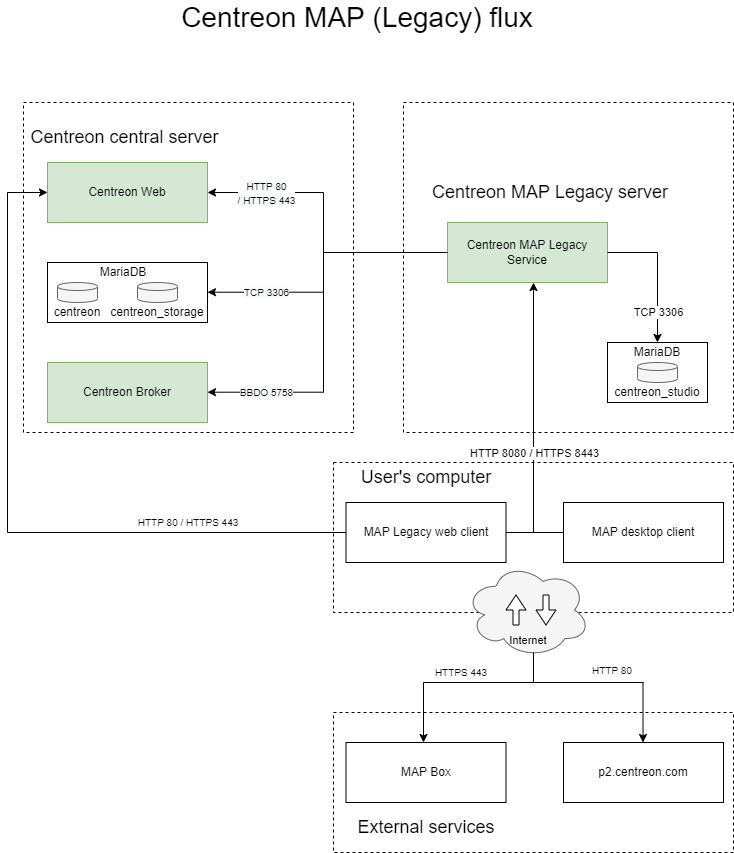
Table of network flow
| Application | Source | Destination | Port | Protocol | Purpose |
|---|---|---|---|---|---|
| Map Server | Map server | Sipmon central broker | 5758 | TCP | Get real-time status updates |
| Map Server | Map server | Sipmon MariaDB database | 3306 | TCP | Retrieve configuration and other data from Sipmon |
| Map Server | Map server | Map server database | 3306 | TCP | Store all views and data related to Sipmon MAP |
| Web + Desktop | Map server | Sipmon central | 80/443 | HTTP/HTTPS | Authentication & data retrieval |
| Web interface | User | Map server | 8080/8443 | HTTP/HTTPS | Retrieve views & content |
| Web interface | User | Internet* (Mapbox) | 443 | HTTPS | Retrieve Mapbox data |
| Desktop client | User | Map server | 8080/8443 | HTTP/HTTPS | Retrieve and create views & content |
| Desktop client | User | Internet* (Mapbox) | 443 | HTTPS | Retrieve Mapbox data |
| Desktop client | User | Internet* (p2 repo) | 80 | HTTP | Retrieve automatic desktop client update |
* With or without a proxy
Prerequisites
Sipmon
The central server and Sipmon MAP (Legacy) must be installed in the same major versions (i.e. both in 22.10.x).
Sipmon MAP (Legacy) Server
License
The server requires the license to be available and valid on Sipmon's central server. To do this, you must contact the support Sipmon support team to get & install your license key.
Hardware
Hardware requirements for your dedicated Sipmon MAP (Legacy) server are as follows:
| Monitored services | < 10 000 | < 20 000 | < 40 000 | > 40 000 |
|---|---|---|---|---|
| CPU | 2 vCPU ( 3Ghz ) minimum | 4 CPU (3GHz) Minimum | 4 CPU (3GHz) Minimum | Ask Sipmon Sales team |
| Dedicated Memory | 2GB | 4GB | 8GB | Ask Sipmon Sales team |
| MariaDB data partition | 2GB | 5GB | 10GB | Ask Sipmon Sales team |
To correctly implement the dedicated memory, you have to edit the JAVA_OPTS parameter in the Sipmon Map (Legacy) configurations file /etc/Sipmon-studio/Sipmon-map.conf and restart the service:
JAVA_OPTS="-Xms512m -Xmx4G"The Xmx value depends on the amount of memory indicated in the above table.
Then restart the service:
systemctl restart Sipmon-mapThe space used by Sipmon MAP (Legacy) server is directly determined by the number of elements you add into your views. An element is any graphical object in Sipmon MAP (Legacy). Most elements (like hosts, groups, etc.) have children which must be included in the count.
These values are applied after optimization of Sipmon MAP (Legacy) tables.
Software
See the software requirements.
Information required during configuration
- Sipmon Web login with admin rights.
Even with a correctly sized server, you should have in mind the best practices & recommendations when creating views so you don't face performance issues.
If the central server is configured in HTTPS, you must apply the SSL configuration on the MAP server. Follow this procedure to secure your MAP server.
Sipmon MAP (Legacy) Web interface
License
The web interface requires the license to be available and valid on Sipmon's central server. To do this, you must contact the support Sipmon support team to get & install your license key.
Compatibility
The Sipmon MAP (Legacy) Web interface is compatible with the following web browsers:
- Google Chrome (latest version at the time of Sipmon software release and above). Please visit the Google Chrome FAQ for a description of the Chrome support policy.
- Mozilla Firefox (latest version at the time of Sipmon software release and above). Please visit the Mozilla FAQ for a description of the Firefox support policy.
- Apple Safari (latest version at the time of Sipmon software release and above)
- Microsoft Edge Chromium (latest version at the time of Sipmon software release and above)
If an update to those supported browsers was to cause an incompatibility, Sipmon would work on a fix in the shortest possible time (for supported Sipmon versions). Though other browsers may work, Sipmon will not attempt to resolve problems with browsers other than those listed above.
Your screen resolution must be at least 1280 x 768.
Sipmon MAP (Legacy) Desktop Client
- 4 GB of RAM minimum, 8 GB advised (mandatory for 10,000 or more services)
- Java 64 bits version 8
- Resolution must be at least 1280 x 768.
- Debian 7,8 or 9
Desktop Client is not compatible with Microsoft Windows Server. * If a version of Java other than 8 is installed, consider installing Java 8 and modifying Sipmon-Map4.ini to add the following line
-vm $path_to_java8$BEFORE-vmwargs.
To optimize the desktop client, you have to "give" it more memory than the default value. Modify the following file:
And add the following lines at the end of the file, on a new line:
-Xms512m
-Xmx4g
Network requirements
Sipmon MAP (Legacy) Server machine must access:
- Sipmon Central broker, usually on Sipmon Central machine, using TCP port 5758
- Sipmon Database, usually on Sipmon Central machine, using TCP port 3306
- Sipmon MAP (Legacy) database, usually on localhost, using TCP port 3306.
All the ports above are default values and can be changed if needed.
- Sipmon Web Central, using HTTP port 80 or HTTPS port 443
Sipmon MAP (Legacy) Desktop Client machines must access:
- Sipmon MAP (Legacy) Server, using HTTP port 8080 or 8443 when HTTPS/TLS is enabled
- Internet with or without proxy.
Ports 8080 and 8443 are recommended default values, but other configurations are possible.
Server installation
Sipmon Web interface
You must provide to Sipmon MAP (Legacy) server a dedicated user who has access to all resources through the appropriate access list groups. Since the password will be stored in human-readable form in a configuration file, you should not use a Sipmon admin user account.
Provide this user with access to the Sipmon Web real-time API:
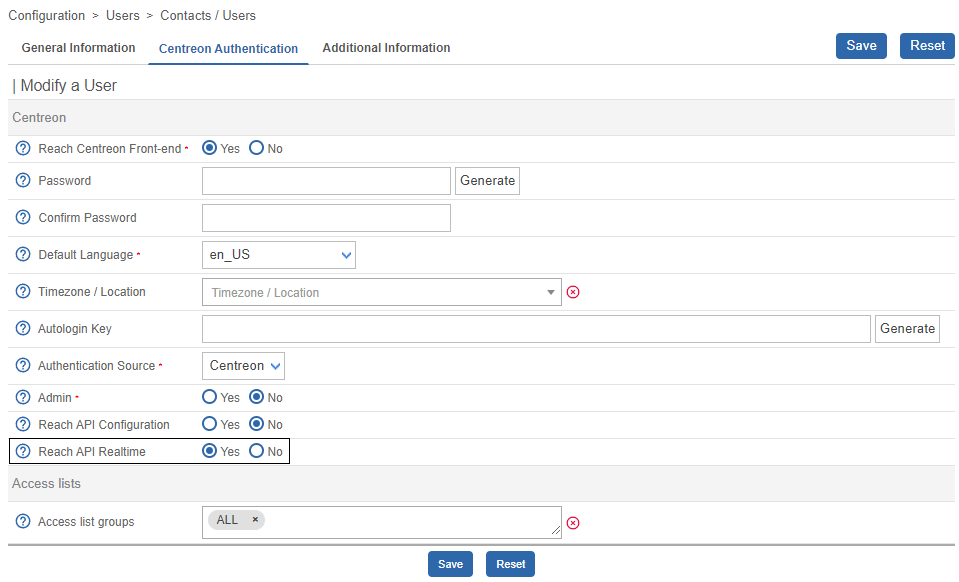
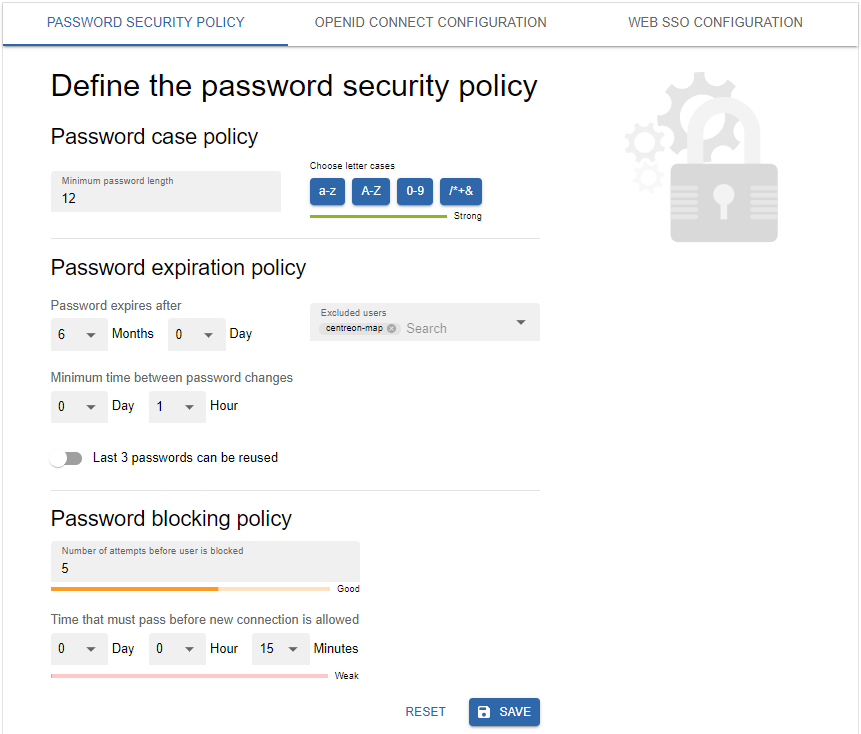
Exclude the user from the password expiration policy on page Administration > Authentication: their password will never expire.
Sipmon Central server
Create a user in the mysql instance hosting 'Sipmon' and 'Sipmon_storage' databases:
CREATE USER 'Sipmon_map'@'<IP_SERVER_MAP>' IDENTIFIED BY 'Sipmon_map';
GRANT SELECT ON Sipmon_storage.* TO 'Sipmon_map'@'<IP_SERVER_MAP>';
GRANT SELECT, INSERT ON Sipmon.* TO 'Sipmon_map'@'<IP_SERVER_MAP>';
The INSERT privilege will only be used during the installation process in order to create new Sipmon Broker output. It will be revoked later.
Sipmon MAP (Legacy) server
Java version requirement
Ensure a version of Java 17 (or 18) is installed before you start the procedure.
- If you need to check the Java version, enter the following command:
java -versionIf you need to upgrade the Java installation to Java 17 (or 18), go to the Oracle official download page.
If several Java versions are installed, you need to activate the right version. Display the installed versions using the following command and select the Java 17 (or 18) version:
sudo update-alternatives --config java- If you need to use your platform in HTTPS, you will have to generate a keystore file for the Java 17 (or 18) version (see the procedure).
Procedure
If you installed your Sipmon MAP (Legacy) server from a "fresh OS installation" you need to install the Sipmon repository:
If the URL doesn't work, you can manually find this package in the folder.
Install Sipmon Business repository, you can find it on the support portal.
Then install Sipmon MAP (Legacy) server using the following command:
When installing Sipmon MAP (Legacy) server, it will automatically install java (OpenJDK 11) if needed.
You need to have a MariaDB database to store Sipmon MAP data, whether it's on localhost or somewhere else.
Execute the following command to install MariaDB:
Configuration
Make sure the database that stores Sipmon MAP data is optimized (automatically added by the RPM in /etc/my.cnf.d/map.cnf):
max_allowed_packet = 20M
innodb_log_file_size = 200M
Then, restart MariaDB:
systemctl restart mariadbSecure the database
Since MariaDB 10.5, it is mandatory to secure the database's root access before installing Sipmon. If you are using a local database, run the following command on the central server:
mysql_secure_installation- Answer yes to all questions except "Disallow root login remotely?".
- It is mandatory to set a password for the root user of the database. You will need this password during the web installation.
For more information, please see the official MariaDB documentation.
Configure.sh script
Execute the Sipmon MAP server configuration script. Two modes are available: interactive or automatic.
- interactive (no option/default mode): Several questions will be asked to interactively fill in the installation variables.
- automatic (--automatic or -a): The installation will be done automatically from the values set in
/etc/Sipmon-studio/vars.shfile
If it's your first installation, we advise you to use the standard mode (interactive) and choose No when asked for advanced installation mode:
/etc/Sipmon-studio/configure.shThe output should look like this:
Configuration completed, enjoy !This script generates the studio-config.properties file.
Custom URI
If you have customized the URI for your Sipmon platform, you need to edit the studio-config.properties file by adding the following command using the custom URI already defined here:
Sipmon.path=/your-custom-uriThen restart the Sipmon-map service:
systemctl restart Sipmon-mapCentral server
Before restarting Broker you must export the configuration from the Sipmon Web interface.
Restart Sipmon Broker on the Central server:
systemctl restart cbdRemove the INSERT privilege from user Sipmon_map:
REVOKE INSERT ON Sipmon.* FROM 'Sipmon_map'@'<IP_SERVER_MAP>';Sipmon MAP server
Check your configuration:
/etc/Sipmon-studio/diagnostic.shIf configuration is correct, the Sipmon-map service can be started from the Sipmon MAP server:
systemctl restart Sipmon-mapEnable the service to start up automatically on server boot:
systemctl enable Sipmon-mapSipmon Map server is now started and enabled, let's install the interface part of the extension.
Web Interface installation
Central server
Install Sipmon Business repository, you can find it on the support portal.
Then execute the following command:
Web
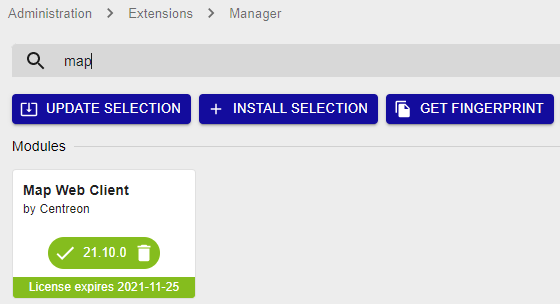
Go to Sipmon > Administration > Extensions and click on the install button:
- License Manager (if not yet installed)
- Map Web Client
Upload the license map.license given by the support team. Refresh the page and the banner must be green with the valid license date.
Click on Back to return to the Extensions page. Now that the module is installed, we will configure it.
Configuration
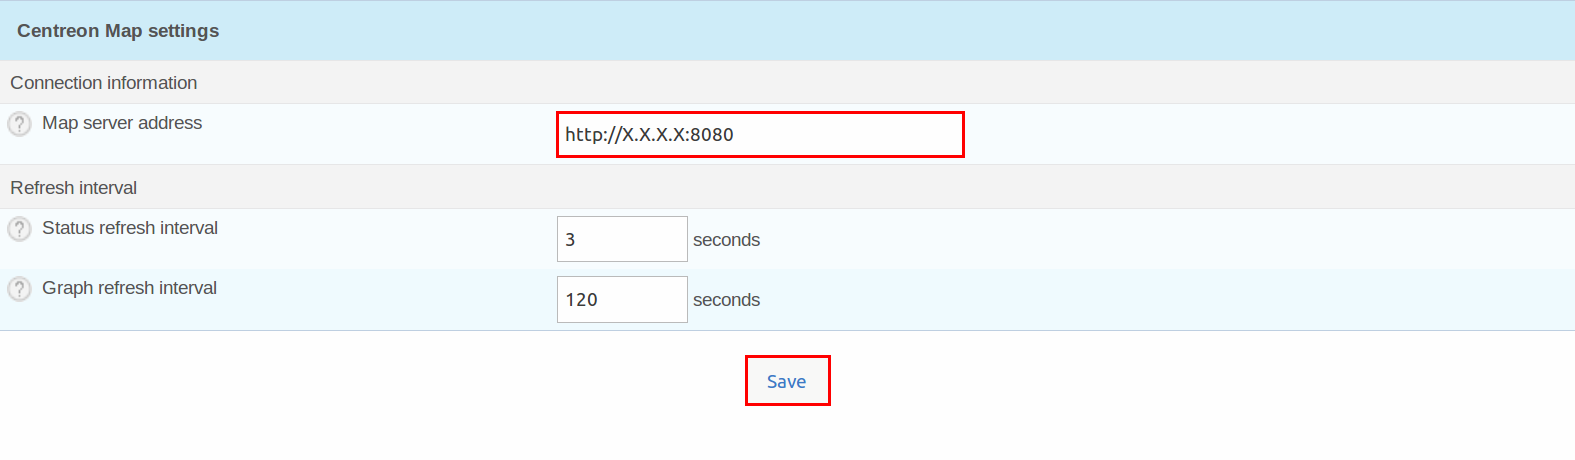
Go to Administration > Extensions > Options, and in the Sipmon MAP menu update the Sipmon MAP server address field:
Use the real IP address/hostname of your Sipmon MAP server.
Using the client
The Sipmon MAP Web interface is now available in Monitoring > MAP.
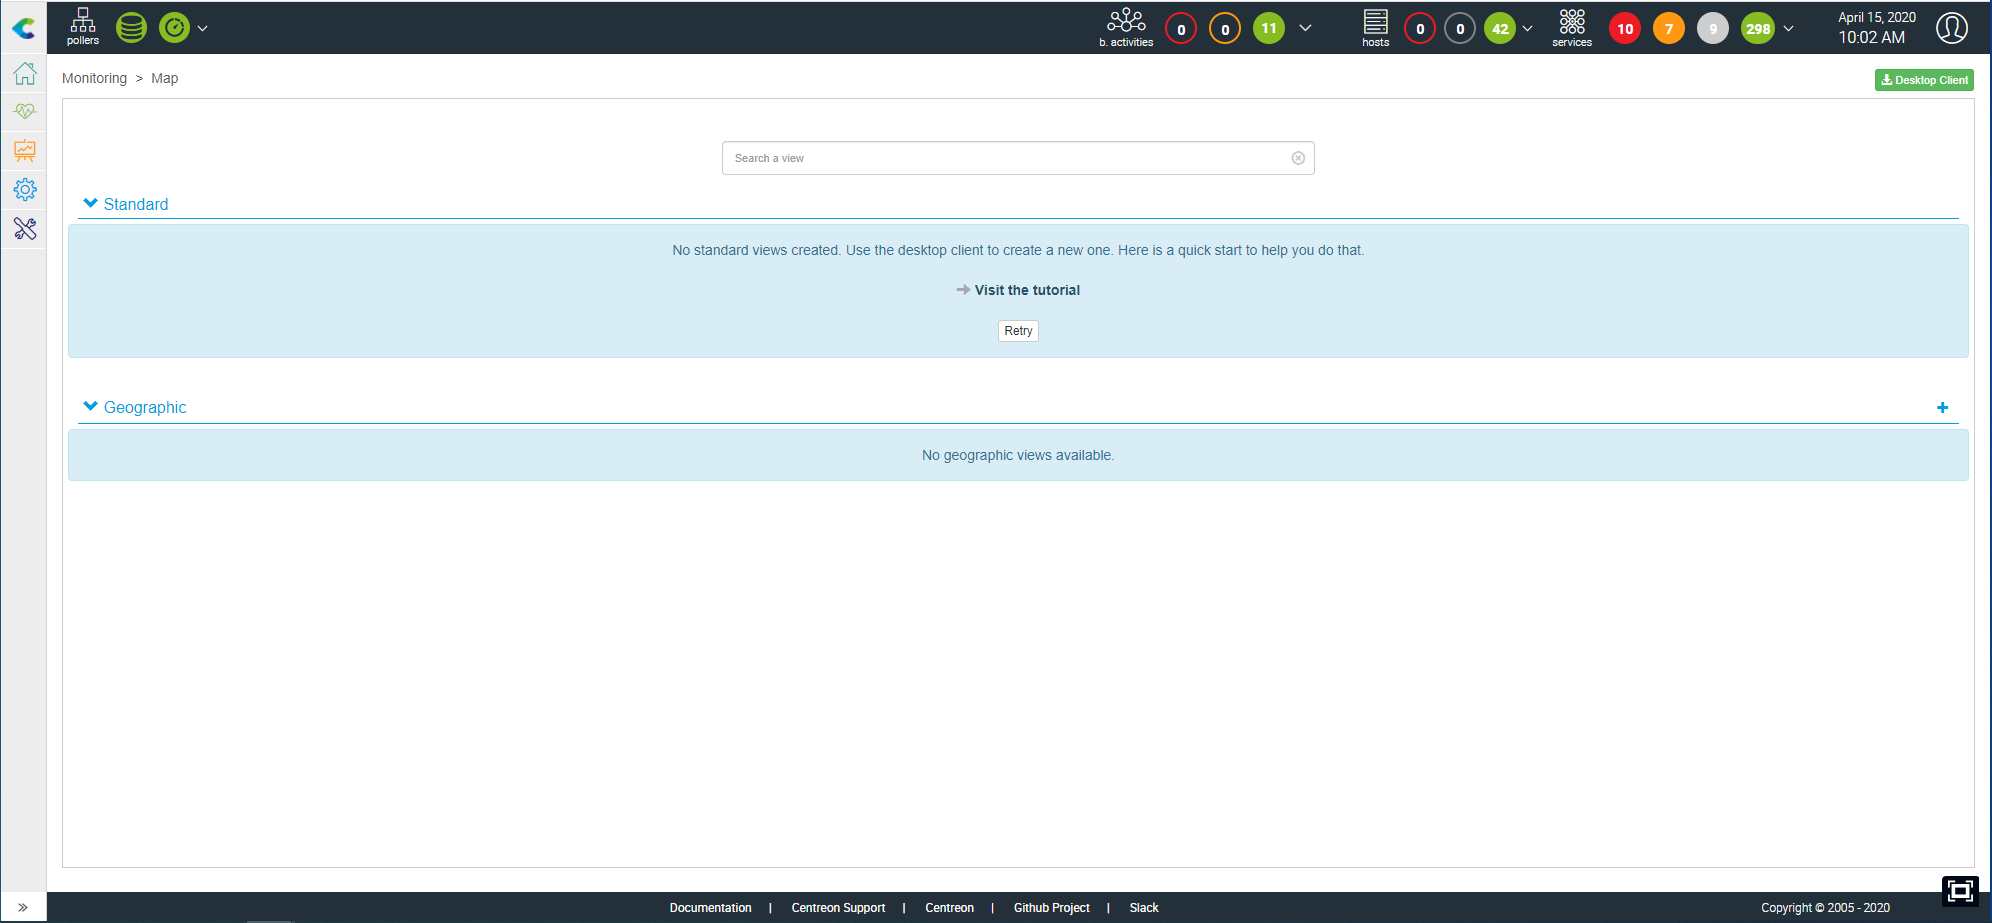
If the content doesn't display, you may empty your browser cache
You can see to which IP the client is connected.

Sipmon MAP Widget
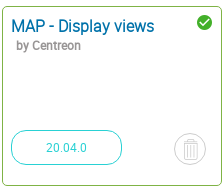
By installing the Web interface, you automatically add the Sipmon MAP Widget, but you need to perform one last task. Go to Administration > Extensions and click on the "Install" button on the widget. The result after installed:
Desktop Client
Executables
The desktop client is currently available only for 64-bit Windows, Mac and Linux platforms (Debian and Ubuntu).
You can find the installers in Monitoring > Map > Desktop Client or here.
For performance considerations, we highly recommend to have less than 5, 10 users maximum connected at the same time manipulating views.
Installation
On user's computer
The desktop client requires Java 8. You can download and install the latest version of Java from here.
Be sure to download the 64-bit version. Browsers are usually 32-bit and the Oracle website generally proposes 32-bit Java instead of the 64-bit version. If you already have Java installed, use the java -version command to check the architecture. If 64-bit does not appear, the version is 32-bit.
On a Mac platform, note that you must install Oracle JDK instead of the usually-required JRE.
To check the Java version run the command:
java -versionUpdates
Once installed, the Desktop Client is automatically kept up to date through an online update system. When it connects to a Sipmon MAP server it automatically downloads and installs the latest version compatible with the server. Auto-update requires your computer to have internet access.
Secure your platform
Don't forget to secure your Sipmon platform following our recommendations