import Tabs from '@theme/Tabs'; import TabItem from '@theme/TabItem';
This topic describes how to install Sipmon MAP. It is recommended to install MAP on a dedicated server. However, if you do not have large volumes of data, you can install it on the central server.
Note to users already using the MAP (Legacy) version: the MAP module does not require the Sipmon_studio database (used for a MAP Legacy server). This database can be removed after migrating your legacy maps to MAP. Be aware that it is not possible to migrate from MAP to MAP (legacy).
License
If you need an additional license for Sipmon MAP, please contact the Sipmon support team to get and install your license key.
Architecture
The diagram below summarizes the MAP architecture.
- You can either install Sipmon MAP on a dedicated server or on the central server.
- Sipmon MAP does not require any installation on your machine: this solution is fully available in the Sipmon web interface.
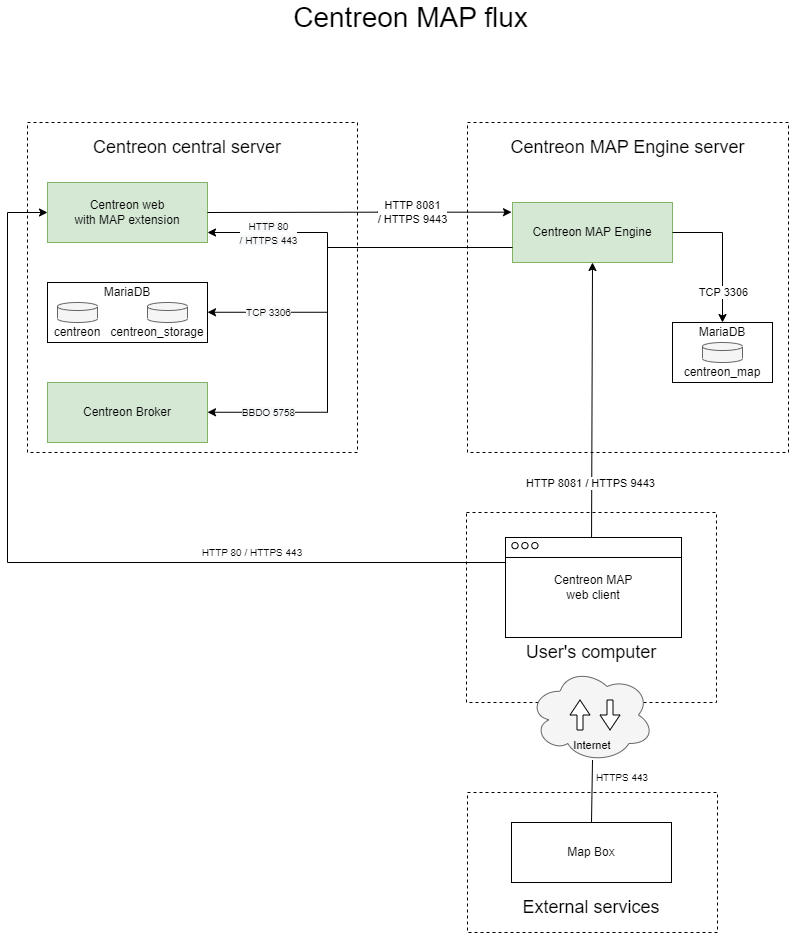
Table of network flows
| Application | Source | Destination | Port | Protocol | Purpose |
|---|---|---|---|---|---|
| Map Server | Map server | Sipmon central broker | 5758 | TCP | Get real-time status updates |
| Map Server | Map server | Sipmon MariaDB database | 3306 | TCP | Retrieve configuration and other data from Sipmon |
| Web | Map server | Sipmon central | 80/443 | HTTP/HTTPS | Authentication & data retrieval |
| Web interface | User | Map server | 8081/9443 | HTTP/HTTPS | Retrieve views & content |
| Web interface | User | Internet* (Mapbox) | 443 | HTTPS | Retrieve Mapbox data |
* With or without a proxy
Prerequisites
Sipmon MAP Engine server
License
The server requires the license to be available and valid on Sipmon's central server. To do this, you must contact the Sipmon support team to get and install your license key.
Software
See the software requirements.
Hardware
Information required during configuration
- Sipmon web login with administration rights.
Even with a correctly sized server, you should have in mind the best practices and recommendations when creating views so you do not face performance issues.
If the central server is configured in HTTPS, you must apply the SSL configuration on the MAP server. Follow this procedure to secure your MAP server.
Sipmon MAP web client
License
The web interface requires the license to be available and valid on Sipmon's central server. To do this, you must contact the Sipmon support team to get and install your license key.
Compatibility
Note that the MAP web interface has the same requirements as the Sipmon web interface. See the prerequisites for the web browsers compatibility here.
Pre-installation
Disable SELinux
Configure or disable the firewall
If your firewall is active, add firewall rules. You can also disable the firewall during installation by running the following commands:
systemctl stop firewalld
systemctl disable firewalld
MAP Engine server installation
Step 1: Set authentication parameters
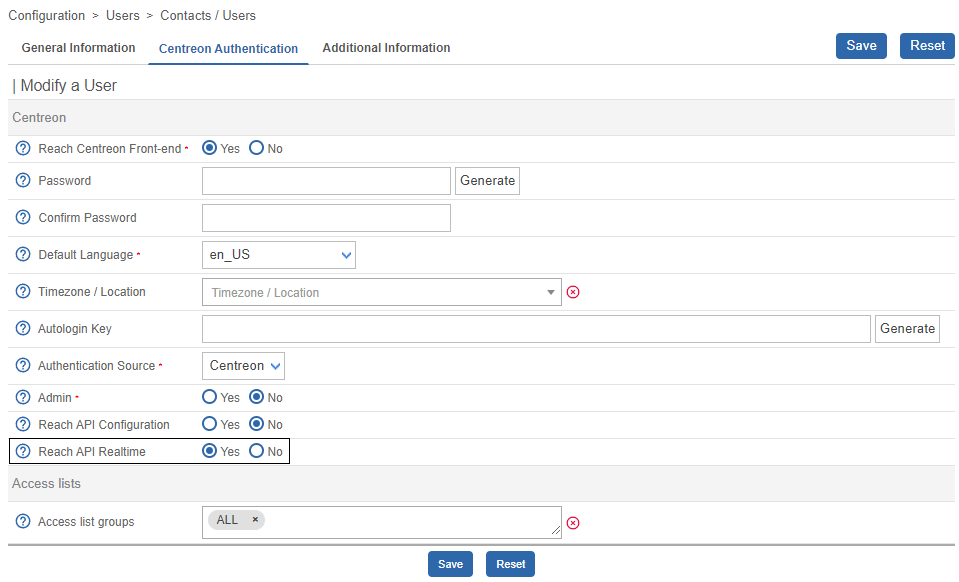
You must provide to Sipmon MAP Engine server a dedicated user who has access to all resources through the appropriate access list groups. Since the password will be stored in human-readable form in a configuration file, you should not use a Sipmon admin user account.
- Log into Sipmon and go to the Configuration > Users > Contacts/Users page. Then click the Sipmon Authentication tab.
- Set the Reach API Realtime parameter to Yes.
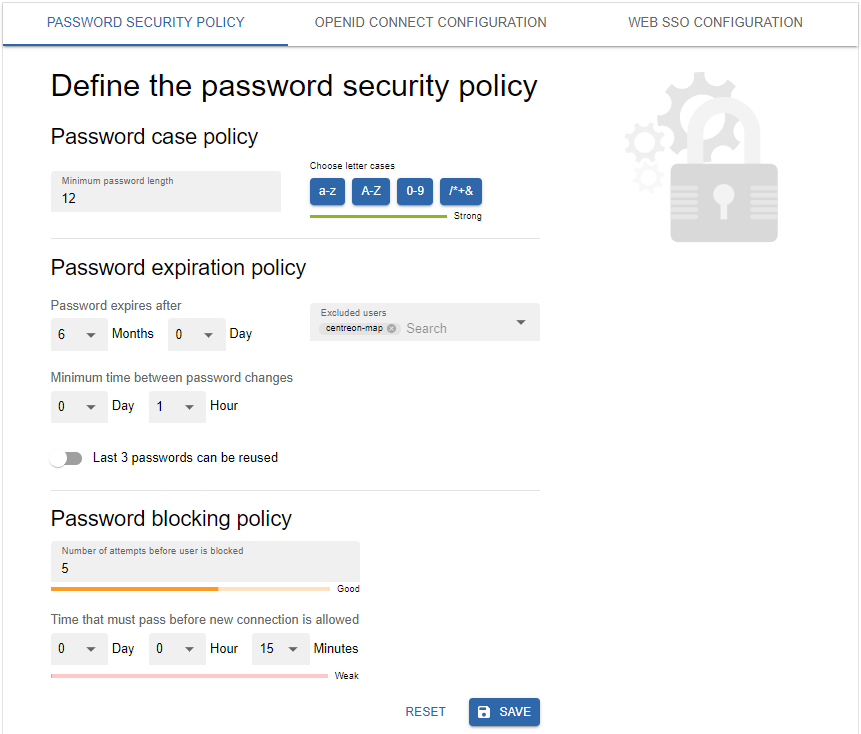
Exclude the user from the password expiration policy on page Administration > Authentication: their password will never expire.
Step 2: Create a MySQL user
From the central server terminal, create a user in the MySQL instance hosting 'Sipmon' and 'Sipmon_storage' databases:
CREATE USER 'Sipmon_map'@'<IP_SERVER_MAP>' IDENTIFIED BY 'Sipmon_map';
GRANT SELECT ON Sipmon_storage.* TO 'Sipmon_map'@'<IP_SERVER_MAP>';
GRANT SELECT, INSERT ON Sipmon.* TO 'Sipmon_map'@'<IP_SERVER_MAP>';
The INSERT privilege will only be used during the installation process in order to create new Sipmon Broker output. It will be revoked later.
Step 3: Install MAP Engine server
Package installation
If you installed your Sipmon MAP server from a "fresh OS installation" you need to install the Sipmon repository:
If the URL does not work, you can manually find this package in the folder.
Business repository installation
Install Sipmon Business repository, you can find it on the support portal.
MAP Engine server installation
You have two possibilities for the installation:
- on a new server (without existing Sipmon MAP packages),
- or on an existing Sipmon MAP server legacy.
Select the right tab below and install the Sipmon MAP Engine server:
When installing Sipmon MAP Engine server, it will automatically install java (OpenJDK 17) if needed.
Java requirement
Ensure a version of Java 17 (or 18) is correctly installed and activated.
- If you need to check the Java version, enter the following command:
java -versionIf you need to upgrade the Java installation to Java 17 (or 18), go to the Oracle official download page.
If several Java versions are installed, you need to activate the right version. Display the installed versions using the following command and select the Java 17 (or 18) version:
sudo update-alternatives --config java- If you need to use your platform in HTTPS, you will have to generate a keystore file for the Java 17 (or 18) version (see the procedure).
Step 4: Check the database configuration
Make sure the database that stores Sipmon MAP data is optimized (automatically added by the RPM in /etc/my.cnf.d/map.cnf or in /etc/mysql/map.cnf for Debian):
max_allowed_packet = 20M
innodb_log_file_size = 200M
Restart MariaDB if you make changes:
systemctl restart mariadbStep 5 : Execute the configure.sh script
Execute the Sipmon MAP Engine server configuration script.
Two modes are available:
- Interactive (no option/default mode): several questions will be asked to interactively fill in the installation variables.
- Automatic (--automatic or -a): the installation will be done automatically from the values set in /etc/Sipmon-map/vars.sh file.
If it is your first installation, we advise you to use the standard mode (interactive) and choose No when asked for advanced installation mode:
/etc/Sipmon-map/configure.shThe output should look like this:
Configuration completed, enjoy !This script generates the map-config.properties file.
Custom URI
If you have customized the URI for your Sipmon platform, you need to edit the map-config.properties file by adding the following command using the custom URI already defined here:
Sipmon.path=/your-custom-uriJava memory optimization
JAVA_OPTS is a standard environment variable used to edit Java properties.
To correctly implement the dedicated memory:
Edit the JAVA_OPTS parameter in the Sipmon Map configuration file /etc/Sipmon-map/Sipmon-map.conf by adding -Xms and -Xmx parameters:
JAVA_OPTS="-Xms512m -Xmx4G..."The Xmx value depends on the amount of memory indicated in the tables in the Hardware section.
Then restart the Sipmon-map-engine service:
systemctl restart Sipmon-map-engineStep 6: Apply Sipmon Broker configuration and restart MAP Engine service
Before restarting Broker you must export the configuration of the central server from the Sipmon web interface.
Restart Sipmon Broker on the Central server:
systemctl restart cbdRemove the INSERT privilege from user Sipmon_map:
REVOKE INSERT ON Sipmon.* FROM 'Sipmon_map'@'<IP_SERVER_MAP>';Then restart the Sipmon-map-engine service:
systemctl restart Sipmon-map-engineRun the following command to check that the Sipmon-map-engine service is properly started:
systemctl status Sipmon-map-engineThis is an example of results:
● Sipmon-map-engine.service - Sipmon Studio map server
 Loaded: loaded (/usr/lib/systemd/system/Sipmon-map-engine.service; disabled; vendor preset: disabled)
 Active: active (running) since Thu 2022-11-24 09:10:58 UTC; 6h ago
Main PID: 39103 (Sipmon-map-en)
  Tasks: 50 (limit: 23465)
 Memory: 598.1M
 CGroup: /system.slice/Sipmon-map-engine.service
         ├─39103 /bin/bash /usr/share/Sipmon-map-engine/bin/Sipmon-map-engine
         └─39119 /usr/bin/java -Dsun.misc.URLClassPath.disableJarChecking=true -XX:+HeapDumpOnOutOfMemoryError -XX:HeapDumpPath=/var/log/Sipmon-map
Step 7: Check the configuration
Check the MAP Engine server configuration by using this command:
/etc/Sipmon-map/diagnostic.shIn case of any error, see the Run our diagnostic tool section in the Troubleshooting MAP topic.
Enable the service to start up automatically on server boot:
systemctl enable Sipmon-map-engineSipmon MAP Engine server is now started and enabled, let's install the interface part of the extension.
MAP web client installation
Step 1: Install the business repository
Install the Sipmon Business repository, you can find it on the support portal.
Step 2: Install the MAP module
- From your terminal, run the following command on the central server:
Then you need to log on to the Sipmon web interface.
Go to Administration > Extensions > Manager and install the Map Web Client module.
Step 3: Activate the MAP module
By default, the MAP module is not enabled. Perform the following procedure to enable it.
Log on to the Sipmon interface and go to Administration > Extensions > Map > Options.
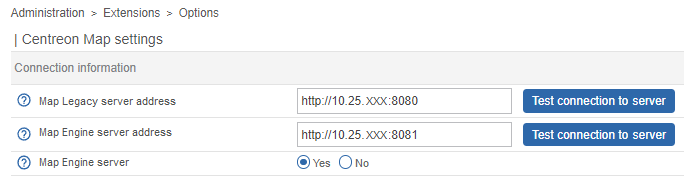
In the Connection information section, set Map Engine server to Yes.
Enter the IP address of your MAP server in the Map Engine server address field. If you installed MAP on the central server, this is the IP address of the central server. Use its full IP address, not the localhost. The default port is 8081 (for instance:
http://10.25.xxx:8081).Click the Test connection to server button to test the connection. This test should return the Connection test successful message.
Click Save.
Go to the Configuration > Pollers > Pollers page. Export the configuration of the central server (using the Reload method).
From your terminal, restart the cbd service:
systemctl restart cbd- Now the configuration is correct, you can start the server by running this command:
systemctl start Sipmon-map-engine- Run the following command to check that the Sipmon-map-engine service is properly started:
systemctl status Sipmon-map-engineThis is an example of results:
● Sipmon-map-engine.service - Sipmon Studio map server
 Loaded: loaded (/usr/lib/systemd/system/Sipmon-map-engine.service; disabled; vendor preset: disabled)
 Active: active (running) since Thu 2022-11-24 09:10:58 UTC; 6h ago
Main PID: 39103 (Sipmon-map-en)
  Tasks: 50 (limit: 23465)
 Memory: 598.1M
 CGroup: /system.slice/Sipmon-map-engine.service
         ├─39103 /bin/bash /usr/share/Sipmon-map-engine/bin/Sipmon-map-engine
         └─39119 /usr/bin/java -Dsun.misc.URLClassPath.disableJarChecking=true -XX:+HeapDumpOnOutOfMemoryError -XX:HeapDumpPath=/var/log/Sipmon-map
You can now use the MAP module by accessing the Monitoring > Map page.
Secure MAP in HTTPS
If you want to use MAP in HTTPS, you must both secure your Sipmon platform and MAP.